True Match® firmware is now available for Kino Flo LED lighting. This free firmware update includes camera LUTs that optimize the LED output to the color science of some of the most popular digital cinema cameras.
Since 1987 Kino Flo has played a huge part in the motion picture film, photography and TV broadcast industries. With its award-winning color science technology Kino Flo has been at the forefront of LED design and manufacturing, creating a color-correct, high color rendering, color stable line of LED lighting. For more than three decades Kino Flo has maintained color quality with the highest standards across all product models.
THE TRUE MATCH DIFFERENCE
True Match proprietary firmware gives you access to the exact look you want to achieve on camera. Instantly dominate the close-ups with fantastic color-temperature, camera lut and dimming options. And get access to expansive color space and white modes, and countless control options, including wireless RDM, DMX and CRMX options.
True Match gives you access to virtually any hue on the color wheel. You can add gels, access full saturated colors with hue angle color adjustments and input RGB values. And if you have an app that gives DMX values of RGB you can match any existing gel out there into your Kino Flo products.
INCREDIBLE ON-CAMERA ACCURACY
Save time and feel confident in what the camera sees on set with the Camera Lut feature of True Match. Camera lut allows for the quality of light emitted from Kino Flo LEDs to harmonize and match with the precise spectral sensitivity of leading cameras, including: Alexa, Sony, Panavision, Panasonic.
VARIOUS CONTROL OPTIONS
Kino Flo has refined further its LED controls. True Match comes with Remote Device Management (RDM), DMX and built-in Lumen Radio wireless DMX controls. The features make on-board control quick and makes it easier for board operators to control Kino Flo LED fixtures when operating them remotely via DMX.
The following products use True Match® Firmware 6.0 DFS:
Diva-Lite LED = Version 6.0 DFS FreeStyle LED Controllers = Version 6.0 DFS Select LED Controllers = Version 6.0 DFS
The Celeb products use the corresponding True Match® Firmware 6.0 CEL2, CEL4 or CEL8:
Celeb 250 = Version 6.0 CEL2 Celeb 450/450Q = Version 6.0 CEL4 Celeb 850 = Version 6.0 CEL8
The Image LED products use the corresponding True Match® Firmware 6.0 L40 or 6.0 L80:
Image L40 = Version 6.0 L40 Image L80 = Version 6.0 L80
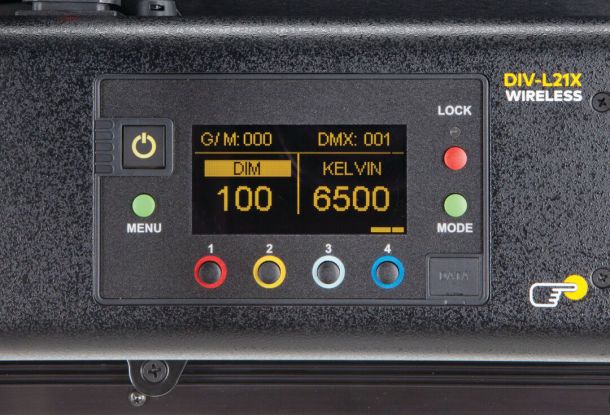
CONTROL PANEL
On /Off:
On = Green light displayed.
Off = Red light displayed.
The display and all menu settings can be operated while the power button is in the Off position, as long as power is applied to the controller. The On/Off button only controls the light source.
Menu
Provides access to menu options such as General settings, Reset, DMX and DMX Wireless, Camera LUT and Color Space.
Shortcut: While on control screen, press and hold for 3 seconds to switch through menus (White, Gels & Hue, RGB, CIE xy and FX).
Preset Buttons
Factory defaults left to right are: 2700K, 3200K, 5000K and 6500K. G/M default value is 000. User can also use these preset buttons to store custom Kelvin and G/M settings.
Display
Provides access to Dim, Kelvin, G/M, and DMX channel. Factory reset will show: Dim = 10%, Kelvin = 2700K, G/M = 000, DMX = 001.
Lock
Press the Lock button to disable all buttons and Control knob. Press for 3 seconds to restore displayed presets to default factory settings.
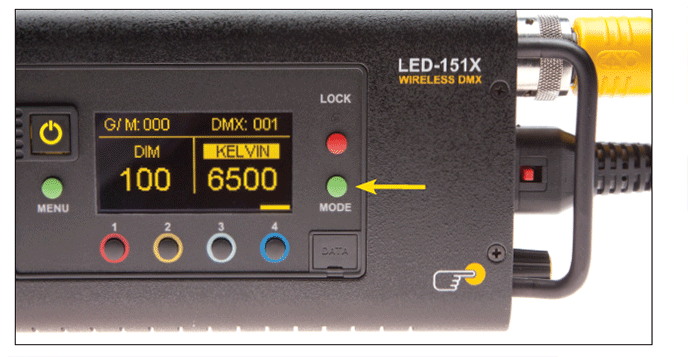
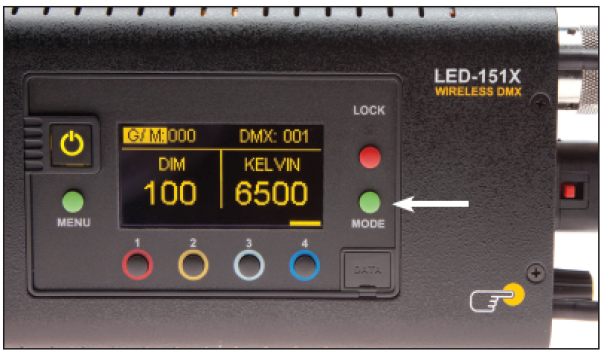
Mode
Press to navigate from Dim to Kelvin and G/M settings. When in sub-menus, pressing Mode always returns you to main display.
When DMX is applied, use Mode to access DMX channel on main display. Shortcut: Long press will bring you back one step.
Data Port
Mini B USB for firmware updates.
DMX Note: Each LED Fixture has an “AUTO TERMINATE” feature. The last fixture that does not have an XLR cable attached to the DMX “Out” port will automatically terminate.
Press the Mode button to selectDim. Rotating the control knob will dim the light of the fixture. Default setting is Fine.
Press the Control knob to toggle betweenFineandCoarseincrements or when selecting options within menus. When the power is turned off or removed, the display will remember its last setting.
Note: Pressing Mode always takes you to a Mode screen. Pressing Menu always takes you to a Menu screen.
The default setting for DIM is that smoothing is on. When smoothing is on, it introduces a time lag such that the individual dimming steps are less noticeable. However, when working in DMX and instant response is required, it is recommended that smoothing be turned off.
The*DIMdesignates that the smoothing function is off.
Note: When in FX mode, the smoothing on/off has no effect other than in TV mode.
In White mode, Kelvin custom settings are between 2700K to 6500K and displayed G/M can be assigned to any preset button by holding down the desired button for 3 seconds. The Kelvin display will flash once the setting is registered.
Default Presets 1-4:
1 = 2700K 2 = 3200K 3 = 5000K 4 = 6500K
Rotating the Control knob will change the Kelvin. Default setting is Fine. Press the Control knob to toggle betweenFineandCoarse increments or when selecting options within menus.
Press the Mode button until G/M is highlighted. Rotating the control knob to the right will adjust towards Green. Rotating to the left will adjust towards Magenta. Default setting is Fine. Press the Control knob to toggle the G/M from Fine to Coarse increments.
The LED software features a G/M (Green/Magenta) control to match the spectral sensitive curves of most popular cameras and other light sources.
Press theLockbutton to lock the Dim, Kelvin and G/M setting (Applies to White, Gels/Hue, RGB, CIE xy or FX Modes). A red indicator light will display in Lock mode. Manual controls will be disabled. To unlock, press the Lock button again. The red indicator will turn off.
Shortcut: The Lock button also has a secondary function. Hold the Lock button down for 3 seconds and the presets 1-4 will be restored to factory settings for the Mode currently displayed.
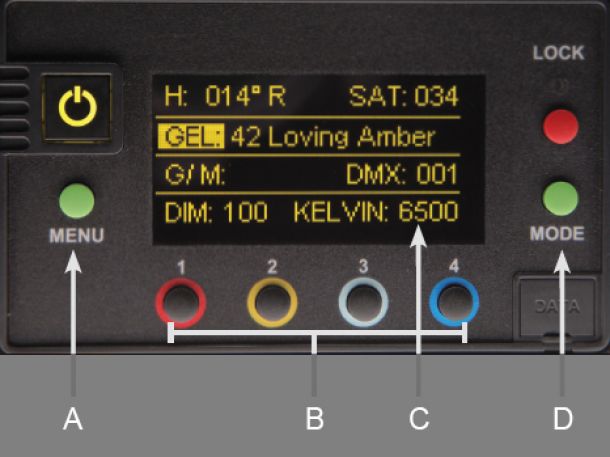
A) Menu: Provides access to menu options such as General settings (Gels/HueMode), Reset, DMX and DMX Wireless, Camera LUT and Color Space.
Shortcut: While on control screen, press and hold for 3 seconds to switch through menus (White,Gels&Hue,RGB,CIE xyandFX).
B) Preset Buttons: Factory defaults left to right are: 2700K, 3200K, 5000K and 6500K. G/M default value is 000. User can also use these preset buttons to store custom Kelvin between 2500K and 9900K and custom G/M, Gel, Hue and Saturation settings.
C) Display: Provides access to Dim, Kelvin, G/M, Gel, Hue/Saturation and DMX channel. Factory reset will show: Dim = 10%, Kelvin = 2700K, G/M = 000, DMX = 001.
D) Mode: Press to navigate from Dim to Kelvin, G/M, Gel, Hue and Saturation settings. When on the Gel function, pushing the Control knob in/out will apply the gel or remove the gel. When in sub-menus, pressing Mode always returns you to main display.
When DMX is applied, use Mode to access DMX channel on main display. Shortcut Tip: Long press will bring you back one step.
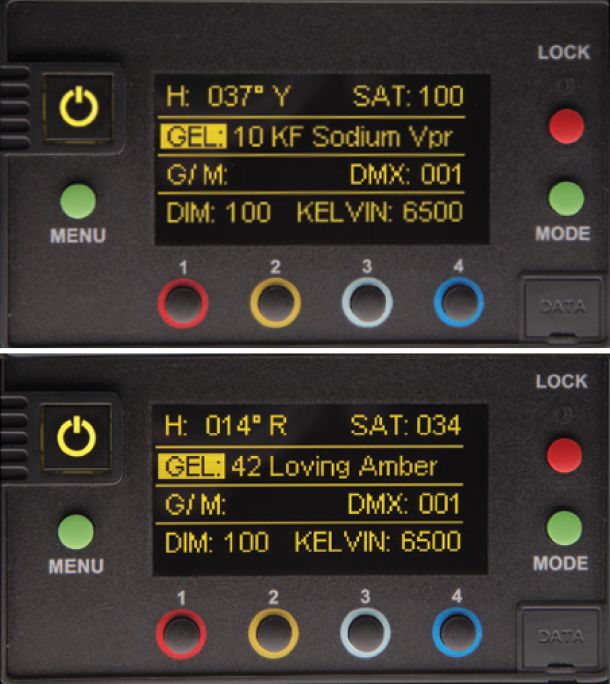
InGels/Huemode (in addition toG/Mcontrol),Gel,Hueangle andSaturationadjustments are available.
Kino Flo Presets and industry standard preset Gels are included. Press Menu, select General and press control knob to change Mode to Gels/Hue.
Press the Mode button until Gel is highlighted. Rotate the dimming knob to choose Kino Flo presets and preset Gels. When on the Gel function, pushing the Control knob in/out will apply the gel or remove the gel.
Press the Mode button untilHueorSaturationis highlighted. Rotate the dimming knob to select custom Hue angle and Saturation. Press the knob to toggle betweenFineandCoarseadjustments.
TheHueangle andSaturationvalues are based on a HSV / RGB model where 0° = Red, 120° = Green and 240° = Blue.
InGels/Huemode,Kelvincustom settings between 2500K to 9900K and displayedG/M,GelorHueangle andSaturationcan be assigned to any preset button by holding down the desired button for 3 seconds. The Kelvin display will flash once the setting is registered.
To restore presets to default factory settings, chooseResetunderGeneralsettings andClear Presets. This method will reset all buttons in all modes. Shortcut: If only want to clear presets for individual display, holdLockbutton for 3 seconds.
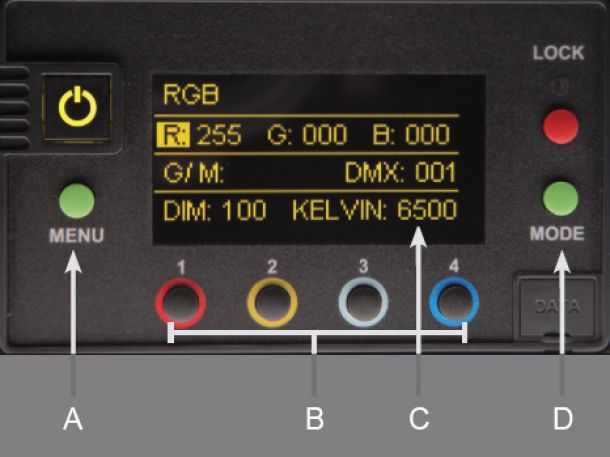
A) Menu: Provides access to menu options such as General settings (RGB Mode), Reset, DMX and DMX Wireless, Camera LUT and Color Space.
Shortcut: While on control screen, press and hold for 3 seconds to switch through menus (White,Gels&Hue,RGB,CIE xyandFX).
B) Preset Buttons: Factory defaults left to right are: 2700K, 3200K, 5000K and 6500K. G/M default value is 000. User can also use these preset buttons to store custom Kelvin between 2500K and 9900K and custom G/M, and RGB settings.
C) Display: Provides access to Dim, Kelvin, G/M, RGB and DMX channel. Factory reset will show: Dim = 10%, Kelvin = 2700K, G/M = 000, DMX = 001.
D) Mode: Press to navigate from Dim to Kelvin, G/M, RGB settings. When in sub-menus, pressing Mode always returns you to main display. When DMX is applied, use Mode to access DMX channel on main display. Shortcut: Long press will bring you back one step.
RGB
InRGB Colormode (in addition to G/M control), individualRGB(Red, Green, Blue) adjustments are available. Press Menu, select General and press control knob to change Mode to RGB.
Press the Mode button until R (Red), G (Green) or B (Blue) is highlighted. Rotate the Control knob to choose individual RGB settings. Press the Control knob to toggle betweenFineandCoarseincrements.
InRGBMode,Kelvincustom settings between 2500K to 9900K and displayed RGB values can be assigned to any preset button by holding down the desired button for 3 seconds. The Kelvin display will flash once the setting is registered.
To restore presets to default factory settings, chooseResetunderGeneralsettings andClear Presets. This method will reset all buttons in all Modes. Shortcut: If only want to clear presets for an individual display, hold Lock button for 3 seconds.
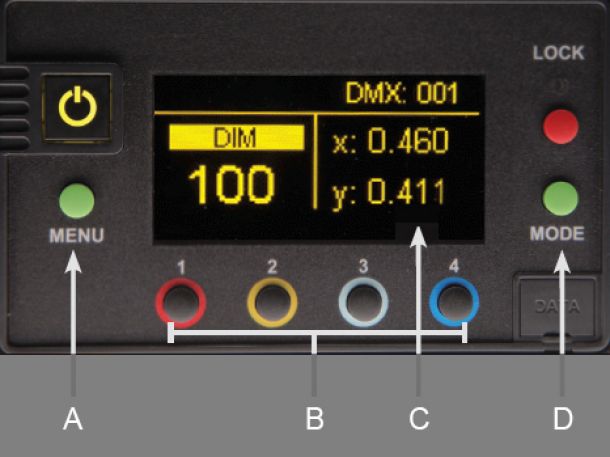
A) Menu: Provides access to menu options such as General settings (CIE xy mode), Reset, DMX, DMX Wireless, Camera LUT and Color Space.
Shortcut: While on control screen, press and hold for 3 seconds to switch through menus (White, Gels & Hue, RGB, CIE xy and FX).
B) Preset Buttons: Factory defaults left to right are: 2700K, 3200K, 5000K and 6500K. User can also use these preset buttons to store custom xy settings.
C) Display: Provides access to Dim, CIE xy coordinates and DMX Channel. Factory reset will show: Dim = 10%, x = 0.460 , y = 0.411, G/M = 000, DMX = 001.
D) Mode: Press to navigate from Dim to xy settings. When in sub-menus, pressing Mode always returns you to main display. When DMX is applied, use Mode to access DMX channel on main display. Shortcut: Long press will bring you back one step.
To restore presets to default factory settings, choose Reset under General settings and ClearPresets. This method will reset all buttons in all Modes. Shortcut: If only want to clear presets for an individual display, hold Lock button for 3 seconds.
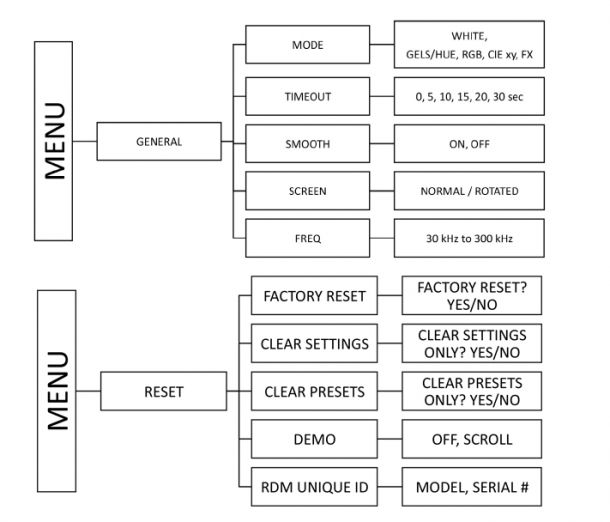
Mode: White, Gels/Hue, RGB, CIE xy or FX Default is White mode. Custom Kelvin settings can be set between 2700K to 6500K. To change to Gels/Hue, RGB, CIE xy or FX mode, press the control knob. Custom Kelvin settings can be set between 2500K to 9900K.
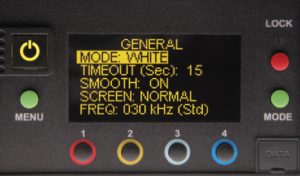
Timeout When choosing settings, if there is no activity, the display will default to Dim. The timeout default is 15 seconds, but can be changed by pressing the control knob to 0, 5, 15, 20 and 30 seconds.
Smooth Default isOn. Press control knob to turn DimSmooth Offfor instant response for special effects such as flashing, flickering, strobing, etc.
Screen Normal Press control knob to rotate display.
Frequency The default setting is 30kHz and is generally considered to be flicker-free for most applications up to 240 frames/per second. However, Frequency can be increased up to 300kHz by increments of 1.
Celeb 250 “Boost” The Celeb 250 includes a Boost mode to increase light output. Boost mode also increases heat of the fixture and should only be used in a studio environment with a controlled ambient temperature of 77°F (25°C) or below.
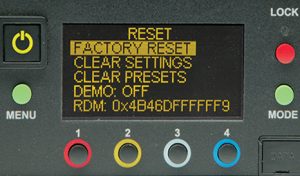
Factory Reset To reset factory settings, press the control knob to selectReset, press to selectFactory Reset. Rotate the control knob to select Yes and press to confirm reset. Main display will default to: Dim = 10%, Kelvin = 2700K, G/M = 000 and DMX = 001.
Clear Settings To clear all settings, but save any presets that have been stored to memory. Press the control knob to select clear settings. Rotate the control knob to select Yes and press to confirm.
Clear Presets To reset Preset buttons 1-4: 2700K, 3200K, 5000K, 6500K. In additionG/Mwill reset to 000. Press the control knob to select Clear Presets. Rotate the control knob press to select Yes and press to confirm.
Note:Clear Presetsresets buttons in White mode, both Color modes, CIE xy and FX mode.
RDM RDM unique ID is displayed. The ID is generated by entering the model number and serial number of the fixture/LED controller at the factory or by the end user.
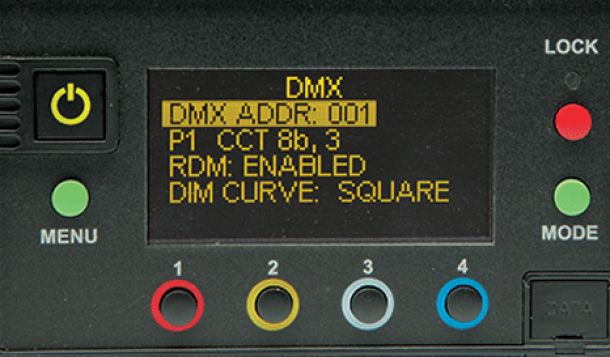
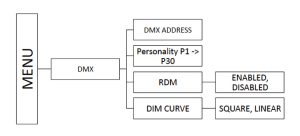
Press the Menu button to select DMX. Press and turn the control knob to select individual digit settings for a valid address from 1-512.
All manual controls are disabled once the DMX cable is applied and DMX is turned on. To regain manual control with the DMX cable plugged in, set the DMX address to “0”.
The color control of the light output can be broken down into 6 categories: White, Gels, Hue angle and Saturation, RGB, CIE xy and FX (Effects).
White: The white mode sets the light to a CCT (correlated color temperature) from 2500 Kelvin (K) to 9900K. For CCT values less than or equal to 4500K, Planckian radiation is used. For CCT values greater than or equal to 5500K, CIE Daylight illuminant is used. Between 4500K and 5500K a proportional mix of Planckian radiation and the CIE Daylight illuminant is used.
There is also a green/magenta tint control that simulates adding a plus green or plus magenta gel on the base white light. The range is from 0 to 100 for both green and magenta where 100 is equal to a full plus green/magenta (or CC30 camera filter).
Gels: User can select from the gel list to simulate that gel on the base white light CCT selected. The first few names in the gel list that start with KF (Kino Flo) are not gels but simulated illuminants such as Candle Flame, Mercury Vapor, etc. These illuminants are independent of the CCT setting when in this mode.
Hue angle and Saturation: The Hue angle and Saturation values are based on a HSV / RGB model where 0° = Red, 120° = Green and 240° = Blue. Saturation is from 0 to 100. When selecting a color in Hue angle and Saturation mode, the RGB color space setting has an effect on the final color. The color space defines the white point (equal value RGB) and the red, green and blue primaries.
The Hue angle and Saturation model used is the HSV model which directly translates to an RGB code value. When the “KF Default” color space is selected, the white point of the RGB color space is variable and defined by the CCT value selected. All other color space settings have a fixed white point of 6500K.
RGB: The RGB mode lets the user directly enter the RGB values. This is useful when using a color picker or other method that outputs the color in terms of RGB. As described in the Hue angle and Saturation mode, the RGB color space setting defines the color of the RGB values.
CIE xy: The CIE xy mode allows the user to enter xy (little x and little y) color coordinates. Little x and y represent the chrominance values derived from the tristimulus values X, Y and Z in the 1931 CIE XYZ color space. These are responses based on the physiologically perceived colors in human color vision.
DIM Curve: Dim Curve defines how the input DMX Dim command is applied. In Linear mode the input DMX command is directly proportional to the Dim level. For example, in an 8 bit personality an address of 127 = 50% Dim. Because single channel DMX is only 8 bit (0-255), the lower end of the Dim curve has the same increment as the higher end. Square Dim applies X2curve and allocates more values to the lower end of the Dim scale.
8 bit vs 16 bit personalities:Standard 8 bit personalities use one DMX slot per parameter. This allows for 256 (0 to 255) values per parameter. 16 bit personalities use two DMX slots for parameters needing finer control. Using two DMX slots gives 65536 (0 to 65535) values per parameter. When a 16 bit personality is selected not all parameters utilize two DMX slots. If the parameter doesn’t benefit from the increased resolution, then there will only be one slot used for that parameter.
Crossfade (xfade): When a crossfade personality is selected, it allows the user to select two different color points and crossfade between the two. This will output the first selected color when the crossfade channel at the zero position and the second color when the crossfade channel is at the highest value. When the crossfade channel is anywhere in between, the color will be a blend of the two selected colors proportional to the crossfade value.
If a fixture loses its DMX signal, it will hold its last DMX command. For this reason, it is important to turn a fixture off using the DMX commands. For example, if you try to turn off the lights by turning off the dimmer board, the lights will remember their last DMX command and stay on. The fixtures require a DMX “Off” or “Black-Out” command in order to turn off.
Information displayed when DMX enabled
1) Personality selected 2) RDM unique ID 3) Wired or Wireless status 4) DMX Address 5) DIM 6) Kelvin Note: Arrows indicate more information. Press button #4 to view.
The LED Controller/Fixtures include a built-in Lumen Radio receiver and can be operated wirelessly with a Lumen Radio transmitter (sold separately). For more information on Lumen Radio Receiver/Transmitter, see www.LumenRadio.com.
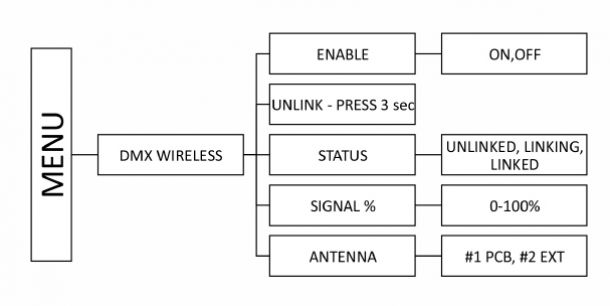
DMX Wireless is an alternative to using DMX cables. Set DMX address. DMX protocol will only operate in one of two methods. User will need to choose between wireless or DMX cables.
Note: DMX fixtures without wireless capability can be daisy chained with DMX cables to a wireless fixture.
Information displayed when wireless DMX enabled
1) Personality selected 2) RDM unique ID 3) Wireless (CRMX) status 4) DMX Address 5) DIM 6) Kelvin 7) Signal bars indicate signal strength Note: Arrows indicate more information. Press button #4 to view.
Enable Enables wireless DMX. Default is OFF. Press the control knob to turn Enable ON. All manual controls are disabled when wireless DMX is enabled.
Unlink – Press 3 secs
Press the control button for 3 seconds to unlink from wireless DMX transmitter.
Status – Unlinked, Linking, Linked This shows the status of the wireless connection. Default is Unlinked. When linking is initiated from the transmitter, the status will display Linking. Once connected, the status will change to Linked. If the fixture is linked to a transmitter that is not present, the status will show Linking.
Signal Indicates signal strength of wireless connection. In main display, up to 5 bars indicate signal strength.
Antenna The default setting is #2 EXT (External). It can also be changed to #1 PCB (Printed Circuit Board)
Note: Controller/Fixture must be powered on. In addition, the wireless transmitter must be connected to a DMX controller with a valid DMX output.
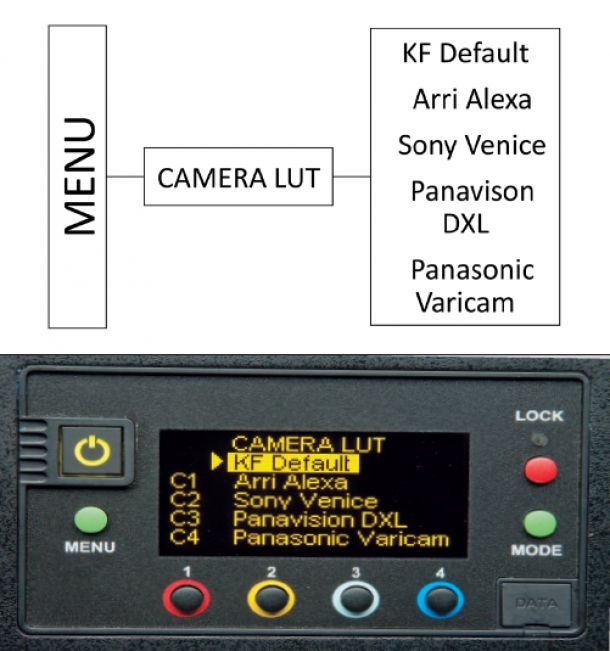
TheCamera LUT(Look-up Tables) feature harmonizes the Kino Flo light sources to the camera. Depending on the camera and the Kelvin setting, some differences are very subtle, while others can be more dramatic.
The corrections are applied as aCIE xycorrection at each CCT (Kelvin) setting. The default setting is targeting the CIE xyz response (human eye).
Press the green menu button to the left of the display screen and scroll down toCamera LUT, then press the control knob. Menu with camera selection will be displayed. Turn the control knob and press to select camera setting:
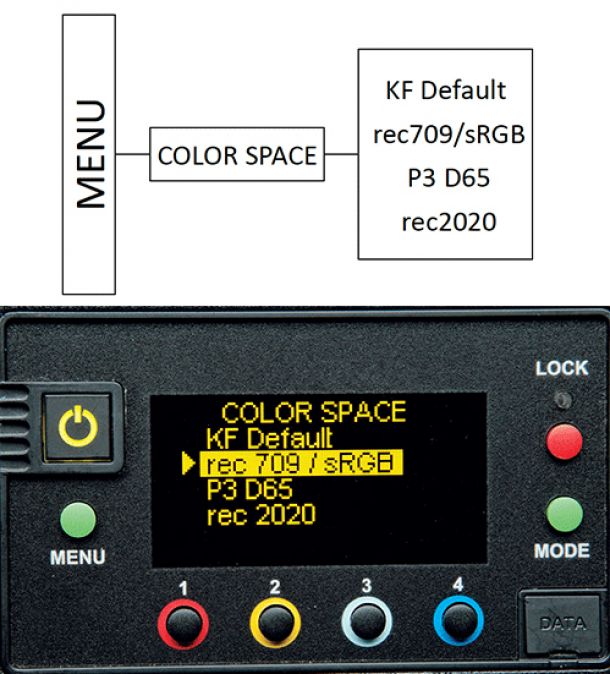
Color Spacedefines the RGB color space used and only affects color – not Kelvin. It is used inRGBmode andHue Angleand Saturation. There are a few instances in the FX (Effects) mode that are also affected when color is used. The RGB color space defines the value of Red, Green, and Blue primaries (in CIE xy) and the white point is fixed at 6500 Kelvin.
Press the green menu button to the left of the display screen and scroll down toColor Space, then press the control knob. Menu with color selection will be displayed. Turn the control knob and press to select Color Space options:
rec 709 / sRGB P3 D65 rec 2020
The color space rec 709 / sRGB is commonly used on computer monitors, SDTV and HDTV television. There are slight gamma variations between rec 709 / sRGB, but not enough to separate into 2 color spaces.
The color space P3 D65 is a common color space for digital movie projection. The color space rec 2020 is used in ultra high definition television (UHDTV). The color space is used when the controller is set to the RGB mode and when set to the Hue Angle/ Saturation mode.
In RGB mode – the color space designation will be displayed at the top of the menu. When changing the Red, Blue or Green values, the Kelvin will be locked in at 6500 for all color spaces. When the Kelvin is locked in, CCT will be displayed as CCT*. When using Green/Magenta the CCT value is unlocked and color space selection has no impact.
In Hue Angle/Saturation mode – the color space designation will be displayed on the Gel line and GEL will be displayed as GEL* and CCT will be displayed as CCT*. The Color space will be displayed only when Hue Angle and Saturation are being used. When using Green/Magenta or Gel, the CCT will be unlocked and color space selection has no impact.